STRENGTH AND FLEXIBILITY TRAINING
Dr. Dubin is a certified strength conditioning specialist. He can customize a strength and flexibility program for individuals to conduct at home or in a gym. A good home exercise routine might include the Flexband®, Thera-ball®, and/or ankle weights. At the gym, Dr. Dubin recommends a program plus a meeting with an experienced personal trainer to review form and technique. These programs will speed up the time of recovery and are helpful in the prevention of re-injury.
ADJUSTMENTS
Adjustments, which are high-velocity, low-force techniques, are used by chiropractors to restore motion to the joints in the spine and extremities. Back pain can be caused by trauma and postrual overstrain. This can cause entrapment of the synovial folds in the facet joints of the spine, which can lead to pain, spasm, and swelling. Adjustments can free up the synovial folds, providing pain relief.
ULTRASOUND
Ultrasound is a treatment that can be useful in speeding up the healing process of injured tissues. Ultrasound travels into the damaged tendons and muscles, causing the molecules to collide, resulting in a deep heating effect. This thermal reaction causes increased metabolic activity and vasodilation of the blood vessels, allowing for more nutrients and oxygen to reach the damaged tissues while washing away many of the pain producing chemicals. The thermal effects of ultrasound decrease pain of the damaged tissues. Ultrasound also has a mechanical effect on the tissues that possibly causes the breakdown of scar tissue. During the first 24-48 hours of a soft tissue injury (the acute stage), the acronym “PRICES” is the preferred method of treatment to control the inflammatory response (Protect-Rest-Ice-Compression-Elevation-Stabilize). Ice, not heat, should be utilized during this period of healing. Pulsed ultrasound can be utilized in the acute stages of an injury to break up scar tissue without the heating effects of continuous ultrasound.
ELECTRIC MUSCLE STIMULATION
Electric muscle stimulation is another therapy that is useful in speeding up the healing process of injured tissues. This device sends an impulse into the damaged tissues, causing the muscles in that region to contract. Ongoing contraction of these muscles will decrease reflex inhibition and help to restore normal muscle tone, and the sensory input of this modality will decrease pain and spasm.
COMBOTHERAPY
Combotherapy combines ultrasound and electric muscle stimulation as a single treatment device. Based on clinical experience, combotherapy is a more effective treatment than just using ultrasound or muscle stimulation separately. Ultrasound and electric muscle stimulation are useful treatment modalities for creating a more favorable environment for the body to heal itself.
ACTIVE RELEASE TECHNIQUE

Dr. Dubin treating Mac Martin, world class athlete, utilizing ART on his Iliotibial Band.
Tissue damage can be caused by:
- excessive postural overstrain (e.g. sitting long hours at a computer screen in an ergonomically incorrect posture)
- repetitive strain injuries (e.g. repetitive typing on a keyboard that does not allow for full range of motion of the metacarpo-phalangeal joints of the fingers)
- direct trauma (e.g. a running back being blindsided by a 300 pound linebacker)
Active Release Technique (ART) is one of the most effective deep tissue techniques for breaking down scar tissue/adhesions and restoring function and movement. Active release technique involves the doctor locating adhesions that are causing the problem, applying tension with the thumbs over these lesions in the direction of the fibers, and then having the patient elongate the musculature while the doctor continues to apply tension to the lesion. By breaking up the adhesions and restoring proper blood flow to the tissues, the patients’ condition will steadily improve. Dr. Dubin was the first doctor credentialed in Active Release Technique in Massachusetts. Active release technique protocols, combined with adjustments, strength training, flexibility training, and other modalities such as combotherapy, enable Dr. Dubin to have predictable treatment success when dealing with musculoskeletal injuries involving the spine or the extremities.
The Role of Active Release Technique in the Three Stages of Tissue Healing
The first 24-48 hours of the tissues’ initial healing response is termed the “reactive phase.” During this phase, prostaglandins are produced, causing pain and inflammation as well as activation of the body’s local and systemic healing processes. The PRICES method of self-treatment is crucial during the initial stage of the injury to limit the primitive response of inflammation and create a better environment for the body to heal itself. The second stage of healing is called the “reparative phase” and consists of three reactions. First, the body’s immune system attacks and breaks down the debris at the site of injury. Then, new blood vessels form in the tissues, supplying them with increased oxygen and nutrients. Finally, there is fibroblast proliferation, which involves the replacement of the injured tissue with new muscle fibers. However, these fibers are not aligned properly, and contracted scar tissue formation can be expected. During this phase, the patient frequently experiences pain in the trigger points, which are regions where the scar tissue/ adhesions exist. The contracted scar tissue has a decreased blood flow that not only limits oxygen and nutritional uptake, but also slows down removal of noxious chemicals. This is why these trigger points are tender to the touch. A contracted muscle is not nearly as strong as an elongated muscle; a contracted muscle will limit full rehabilitation potential. Also, a contracted muscle demands more energy then an elongated relaxed muscle, and this is further impeded by decreased blood flow. The last phase is “tissue repair,” where the goal of treatment is to regain the pre-injury strength and flexibility of the damaged tissue. During phases 2 and 3, treatment focus should be on restoring proper alignment and function of the newly laid down and disorganized muscle fibers. This will create a more favorable environment for healing to occur and will potentially allow the patient to regain 100% function to this region. Deep tissue manipulation such as ART enables the doctor to achieve this goal.
TREATING INFLAMMATION
An injury caused by a forceful trauma (such as an ankle sprain) or a repetitive strain (such as overuse of the back from lifting) will result in an inflammatory response. Inflammation isolates the injury and activates the local and systemic defense and repair processes. Inflammation is a good thing, as it is necessary for proper healing of the tissues to occur. However, inflammation is a primitive response, and may become detrimental to the healing process if it is not controlled. Too much inflammation can lead to a delay in the healing process, as well as excessive scarring, ongoing chronic pain, and improper movement patterns. The key to tissue healing is to maximize the positive effects and minimize the negative effects of inflammation, thereby creating the ideal environment for the body to heal itself. When cell membranes of tissues are damaged, prostaglandin is released into the surrounding region, causing the surrounding capillaries to swell. Prolonged inflammation will decrease nutritional flow to the injured tissues, cause scarring, and ultimately lead to dysfunctional muscle groups, improper motion patterns, prolonged dysfunction, and ongoing pain sensitivity. The acronym PRICES has been used by the medical community to describe the proper measures to take in the acute phases (first twenty-four to forty-eight hours) of an injury.
- P = protect
- R = rest
- I = ice
- C = compress
- E = elevate
- S = stabilize
Ice will cause vasoconstriction of the capillaries. Both ice and compression result in improved reabsorption of fluids and decreased pain. Elevation will help drain fluids away from the injury. These three methods will limit the primitive responses of inflammation and create the optimum environment for tissue healing. As a general rule, ice should be applied to the injured tissue over a 20-minute period with a 1-hour rest period between applications. Studies have suggested that ice therapy combined with compression is more effective then ice therapy alone, so the ice pack should be secured with an ace bandage. Individuals suffering from Raynauds phenomenon, peripheral vascular disease, or susceptibility to frostbite should be cautious when utilizing this technique.
Using a typical inverted ankle sprain as an example, here is how PRICES works:
- As soon after the injury as possible, take two ice/gel packs and place one on the outside and one on the inside of ankle.
- Wrap an ace bandage around the foot and ankle for support and compression.
- Place three pillows under the leg and rest the ankle in an elevated position.
During the first 6 days of the inflammatory process, non-steroidal anti-inflammatory drugs (such as Ibuprofin) are useful in inhibiting prostaglandin formation, thereby limiting inflammation. These medications may be purchased over the counter or prescribed by your doctor (for stronger doses) and should be taken after a meal to prevent gastric upset.


 Nancy came to the office complaining of pain on both sides of her neck and in between her shoulder blades. She could not remember a particular incident that caused her neck and mid-back pain, but stated that the pain came on gradually, became more intense, and was starting to affect her everyday life.
 Sciatica is a condition in which the pain is typically perceived as radiating from the low back to the posterior buttocks, posterior thigh, and occasionally below the knee into the posterior calf and foot (Fig. 1). A disc herniation (Fig. 2B) or degenerative changes in the lumbar spine (Fig. 2C) can lead to sciatica. A normal, unherniated disc, in comparison, is shown in Figure 2A.
 A disc herniation is a “leaking” of a portion of the jelly-like material between two vertebrae, and occurs most frequently in the third to fifth decades of life. The disc, the shock-absorbing cushioning between vertebrae, may become prone to tears because of weakening of the fibers that surround the nucleus pulposis, which is the center of the disc (Fig. 4A and 4B).
 These symptoms may become less intense when bending forward, which opens up the intervertebral foraminal space and takes pressure off the nerve root. Bending backwards, on the other hand, will narrow the intervertebral foraminal space, increasing pressure on the exiting nerve root, causing increased pain. Note that this is in direct contrast to suffering from sciatica due to a herniated disc: patients’ descriptions of that cause pain and that bring relief are used to help determine the cause of the sciatica.
 Impingement syndrome is a shoulder disorder characterized by a dull aching on the front and outside of the upper part of the arm that sometimes radiates to the elbow. Sleeping on the injured shoulder is painful, and when raising the arm by the side, the pain can be sharp and stabbing in nature. Impingement syndrome is common in individuals participating in sports such as volleyball, swimming, basketball, tennis, and baseball, and in occupations requiring arm movements above the shoulder or head. These activities may cause a repetitive strain injury to the muscles surrounding the shoulder, leading to faulty joint motion and compression on tendons in the shoulder, resulting in impingement syndrome. An explanation of the biomechanics of the shoulder will make it easier to understand the causes of impingement syndrome and how to treat and prevent it.
 The glenohumeral joint, or shoulder joint, is a ball-and-socket articulation where the round head of the humerus fits into the concave glenoid fossa of the scapula (Fig. 1).
 Normally, when the arm raises from 60 to 140 degrees (Fig. 6), the upper trapezium, lower trapezium, and serratus anterior muscles move the scapula and the attached acromium process upwards, maintaining the suprahumeral space. improper function of the rotator muscles or the muscles surrounding the scapula can lead to a decreased supra- humeral space when moving the arm away from the side of the body, increasing the of injury to the supraspinatus and long head of the bicep tendons and eventually to the development of impingement syndrome. This syndrome, while often caused by acute or overuse injury, may also be due to degenerative changes, in which case referral to a surgeon would be recommended.
 Shin splints are an inflammatory condition of the lower leg tendons, muscles, or outer covering of the shin bone (periosteum). Exercise or athletic activities such as walking, jogging, running, or step aerobics can cause microscopic tissue damage to these areas. Normally, these small injuries heal, but when tissue damage occurs faster then tissue repair, inflammation ensues and leads to the development of shin splints. Shin splints can be separated into subcategories: anterior shin splints and posterior shin splints. Anterior shin splints would be described as pain down front and outer side of the leg, while posterior shin splints would be described as down the back and inside of the leg.
 Shin splints are a very common running injury. Analysis of the biomechanics of a typical running gait may help in understanding why this injury is so common in runners. It also gives clues on how to prevent it.
 The stance phase can be divided into three phases: contact phase, mid stance phase, and propulsive phase, making up approximately 25%, 40%, and 35% of the stance phase respectively (Fig. 1). The contact phase begins at heel strike and ends at full forefoot loading (FFL), when the outer part of the foot and later the inner part of the foot make contact with the ground surface. Where the heel bone, calcaneus, and talus come together is the subtalar joint (Fig. 2A & 2B). During the contact phase, this subtalar joint pronates, which involves the heel bone tilting laterally, and the foot moving outward and upward. This movement allows the foot to be mobile, adapt to the ground surface, and absorb the shock of impact (Fig. 3A).
 The anterior musculature of the leg — tibialis anterior, extensor digitorum longus, and the extensor hallucis longus (Fig. 4A & 4B) — decelerate the foot as it approaches the ground surface for impact before FFL (Fig. 5). Running on too many downhills and/or increasing running distances too quickly predispose a runner to developing anterior shin splints. This is because of the increased demand on the anterior leg muscles to decelerate foot slap. Driving long distances with the foot pressing on the gas pedal can also lead to fatigue of the anterior leg musculature and the development of anterior shin splints.
 Repetitive use of the Achilles tendon and triceps surae occurs during the midstance phase of gait/motion, and can result in trauma to the area. Tendons have fewer blood vessels than muscles, which means that less oxygen and nutrients can get to them. Faced with this shortage of blood supply, tendons take a longer time to heal than muscles. If the trauma to the tendon is faster than the rate of healing and repair, Achilles tendonitis will result.
 Treatment at Dr. Dubin’s office of a grade 1 or a grade 2 tendonitis would consist of adjustments to the ankle and foot to free up joint motion, deep tissue to the musculature of the and leg to free up soft tissue motion, and ultrasound and electric muscle stimulation combotherapy to restore normal tone, help in the healing process, and decrease pain. The patient would be encouraged to ice the Achilles tendon for 20 minutes after each training session. A strength-training program for the lower extremities would be implemented, emphasizing eccentric strength training of the Achilles tendon. Stretching of the Achilles musculature and tendon could be conducted on a step (Fig. 4A & 4B), and a stretching routine for the lower extremities utilizing the Flexband® would be encouraged.
 Semi-rigid orthotics with no more than 7/8″ medial arch support can be a useful tool in the prevention of Achilles tendonitis in runners who have high arches or flat feet. A temporary 1/8″ heel lift can also be added to the orthotic to limit dorsiflexion of the foot; this would take pressure off of the injured Achilles tendon. Achilles tendonitis is common in recreational runners who act as their own coaches. These runners may prematurely increase the intensity, duration and frequency of their running sessions. Proper training techniques would allow for adaptive changes of the Achilles tendon, including strengthening of the tendon and increased blood supply to the area. These changes will increase the ability of the Achilles to accept increased activity but they take time and patience. For marathon runners, initially a training base of four miles needs to be established at 65%-75% maximum heart rate. Later, a training schedule should be followed. A proper warm-up consisting of a jog will increase the blood supply to the muscles and tendons, making them more efficient in absorbing loads. Hill training should gradually be added to a training route because uphill running will increase the eccentric load on the Achilles tendon. Runners should also change their every 250-400 miles, during which their sneakers have lost approximately 40% of their shock absorption capabilities.
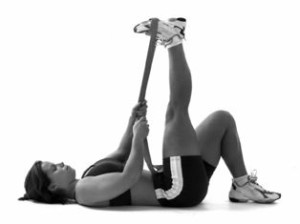 Hamstring Stretch
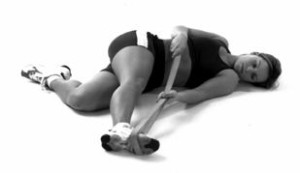 IT band/Glutes/External rotator stretch
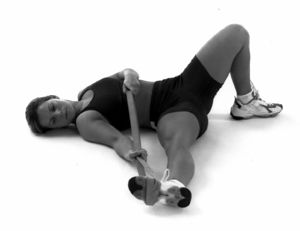 Groin Stretch
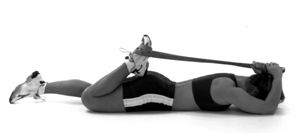 Quad Stretch
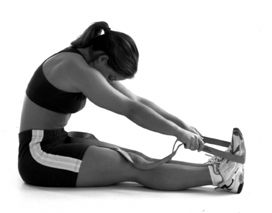 Low Back Stretch/Erector Spinae Stretch